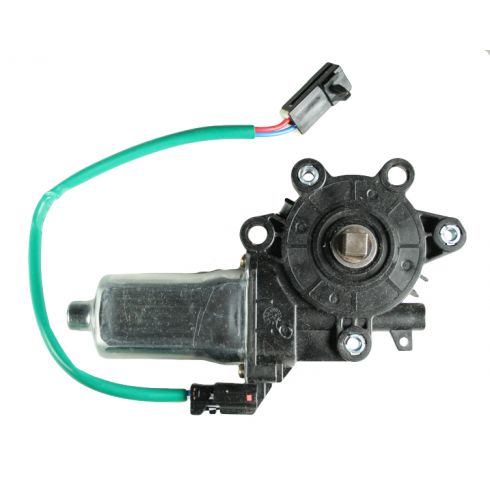
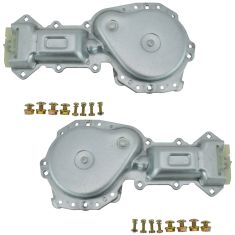
Replaces
Item Condition:
New
Attention California Customers:
 WARNING: This product can expose you to chemicals including Chromium (Hexavalent Compounds), which is known to the State of California to cause cancer, and birth defects or other reproductive harm. For more information, go to www.P65Warnings.ca.gov
Lifetime Warranty
This item is backed by our limited lifetime warranty. In the event this item should fail due to manufacturing defects during intended use, we will replace the part free of charge. This warranty covers the cost of the part only.
FREE Shipping is standard on Orders shipped to the lower 48 States (Contiguous United States). Standard shipping charges apply to Hawaii, Alaska and US Territories. Shipping is not available to Canada.
Expedited is available on checkout to the United States, excluding Alaska, Hawaii and US Territories as well as P.O. Boxes and APO/FPO/DPO addresses. Final shipping costs are available at checkout.

Created on:
Tools used
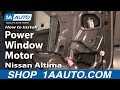
Brought to you by 1AAuto.com, your source for quality replacement parts and the best service on the Internet.
Hi, I'm Mike from 1A Auto. I hope this how-to video helps you out, and next time you need parts for your vehicle, think of 1AAuto.com. Thanks.
In this video, we're going to show you how to replace one of the front window motors on this 2000 Nissan Altima. We do this on the driver's door, but the passenger's door is the same procedure. This is basically the same for any '98 to '01. The tools you'll need for the job include a small flat blade screwdriver, a Phillips screwdriver, a 10mm socket, a ratchet, and socket extensions.
Remove your door panel. First, use a small screwdriver and carefully pry up here to pull this corner straight off. Then, you want to go under here and pry straight up firmly on your switch panel. Turn it over and there's a button right here. Press that button and disconnect your switch panel. Use a small screwdriver, and there's just a little trim button down here pry it up. You can see it's a Phillips screw right there. Just fast-forward as I remove that screw and then pull that door pull cup up and out. Then remove this bezel. You can see mine is broken already so it makes it a little easier to come off. Basically, there four tabs. You want to pry in between this back part on the tab and pull out on the bezel at the same time to pull it off. Now, grab hold and pull firm on the bottom, then lift the panel up and off.
Now you want to pull the water shield back. Start by taking the two screws off that hold the small speaker near the door handle. Then take the screw out in the middle of the door handle and slide it back. Then remove the two screws that hold the bracket in the middle of the door, and then slowly and carefully pull the water shield down to give yourself access to the inside of the door. Next use a 10mm socket with a ratchet to remove this brace. We'll fast-forward here as we just remove those four bolts and that brace.
Here, I have my window positioned so I can get to these bolts pretty easily. If you can't get your window repositioned to here, you'll want to use a wrench. It's pretty much so you can get to the bolts. It might just take a little bit of wrangling to get the wrench in and take those bolts out. You use a 10mm socket with an extension to remove those bolts. When you have those bolts out, you put the window up, tilt it forward, and lift it out all the way.
Now, you want to remove this bolt and loosen this one. Remove these two down here and then remove these three here. This is your lead here for the window motor. Pull back on this tab and pull it up and out. Then pull this tab from the door. Fast-forward here again as I just remove those bolts that pointed out to you. Once you have those all off, feed this harness right through there, lift up on your motor, bring it out, and then bring the assembly right out that way. It's pretty straightforward there are three screws. It just takes some strength to get these loosened. Here, I'm just pressing the back of the wiring clip that clips the wire onto the motor bracket, and pushing that through.
A new motor from 1A Auto is going to bolt on there exactly the same. Just get the square gear to mesh into the gear of the window regulator and put it down on. Apologize for the bad angle, shot it on the back. You get the motor on there, and then start the three screws in and tighten those screws up. This motor was slightly different in that it just came with an accessory pigtail. You just want to plug that in and that plugs into your vehicle's harness the same way. Make sure you put this bolt back in, so start it in right here, put the motor, regulator next to the window, right through, and hang up the regulator there. Hang up the motor here, bring your harness through and reconnect it. Now I'll fast-forward here.
Just to summarize, you put the new regulator and motor in, you start that bolt in first, and then you can hang the regulator rail up with that bolt, and then you hang the motor up with the tabs that are on the bracket. Then put all the bolts in by hand first and then tighten them up. When you tighten them, you want to tighten them nice and firm. Don't over tighten them, though. Make sure it's in the back and in the front here, lower it down slowly, and make sure it comes in contact with the regulator.
Next, you want to make sure it's positioned here to put these two bolts back in. On these bolts, you'll maybe have to just grab the window, move it around a little bit as you push in on the bolts, and turn them clockwise to get them started. When you tighten these up you are going into a plastic fitting, so don't over tighten them or you'll strip the plastic. Turn the key on, and you can see here that a weak battery causes a slow up movement.
I'm going to fast-forward through here as I put the door back together and get the water shield back up in place in preparation for putting the door panel back on. To put the panel back on, just make sure that your harness comes up through and lift it into the right place. Push it against the window and down.
We hope this video helps you out. Brought to you by www.1AAuto.com, your source for quality replacement parts and the best service on the Internet. Please feel free to call us toll-free, 888-844-3393. We're the company that's here for you on the Internet and in person.
Tools used
Brought to you by 1AAuto.com, your source for quality replacement parts and the best service on the Internet.
Hi, I'm Don from 1A Auto. I hope this how-to video helps you out, and next time you need parts for your vehicle, think of 1AAuto.com. Thanks.
In this video, I'm going to show you how to replace a rear window motor on this 2000 Nissan Altima, pretty much the same as any 1998 to '01 Altima. Usually you need to replace the motor when the window's not working and you press the switch and nothing happens. Tools you'll need are small flat blade screwdriver, a Phillips screwdriver, a 10mm socket with ratchet and extension, a putty knife or something similar to pry the door panel off, and you may need an impact driver. I show you how to use one in this video, although sometimes if you use a screwdriver and tap it with a hammer, that's good enough to get the screws that hold the motor loose.
Start by taking a flat blade screwdriver and there's a little trim button right down in here. You have to be careful, there's a little sticky stuff down in here sometimes, pry that up and then there's a Phillips screw there. Then here, you need to carefully, and you can see this is actually already been broken, but carefully go in here and pry out. Up here, pry out, and up here, pry out as well. Then remove this bezel. You can see it has four places where clips go in. Here I'm just using a Phillips screwdriver, take out that screw, and pull up on that pull cup. The pull cup comes up and off and the switch comes out with it; pull it backwards and out. Then underneath there's a tab on the harness where it connects, push the tab down, disconnect the harness.
I'm going to pull out, work your fingernails underneath, and pull out on the door panel and release a bunch of clips. Lift the panel up and off. Fast-forward here a little bit, there is a bracket on the middle of the door, use a 10mm socket and ratchet or a screwdriver would work and remove the bracket so that you can then pull that water shield down. You might be able to tell that somebody just cut the water shield before, that's not what you want to do, you want to pull it off, try not to damage it, keep it intact.
Now with that water shield out of the way, you'll see a brace that is held on by another four 10mm bolts. Remove those and remove the brace. Next there are six bolts that hold the regulator and motor assembly to the door. You'll see me removing those six bolts. You'll have to lift the window motor up a little bit and then down in, and you can see that the regulator and whole window assembly slides down a little bit. This allows you to get to the bolts that hold the window to the regulator. Here's a close-up. There's the kind of gold bolt right there and then there's one tucked in further. Here I'm using a 10mm wrench and kind of reaching in there and getting to that bolt that's kind of hidden in the door panel, and then I'll speed it up here as I remove that. Now, here I'm removing that other bolt that's fairly easy to get to, and once I get that out, then you're able to just grab hold of the window and lift it up. Just hold the window up with some painter's tape.
There's a little tab where you connect the harness. Pull that up and pull that off, and then you can just kind of reach in here and squeeze the two tabs for the motor harness. Bring the regulator and motor right out.
You may find you have to use an impact driver, what this is. You put it down into the screw and then you hit it, and it loosens the screw. Put it in the screw. You turn it counterclockwise. I'm just hitting it with the back of my hand. Yeah, it loosened the screw. Usually on these you can get them just by pressing really hard with a regular Phillips screwdriver.
Actually, first remove the clip for the harness, pull one side out, and carefully remove it. The motor, new motor from 1A Auto, put it on there. I'm going to fast forward as I put the screws back in and tighten them up with a screwdriver. Again, this is the part where, to get this apart, you may be able to be successful at getting it apart by using the screwdriver and just tapping it with a hammer as you try and loosen the screws. Usually it comes apart that way, rather than using the impact driver.
I've got my regulator-motor assembly back here, and I've actually hooked up the motor, and I've got my switch hooked up. What you'll want to do is carefully just run your regulator down a little bit, okay, and then put this bolt back up in here, and disconnect this again, and put the motor in and the regulator. The motor bracket hangs up there, and then, it comes down and hangs up right there. With the regulator, put that in. Then what you're going to do, is I'm going to bring the harness down, right out through here again. Reconnect them, and clip that on there. I still have the key on, I'm going to run this down until this hole lines up and I can see right through here. I'm going to fast forward again here as I disconnect the switch, and then I actually turn the key off on the car. Then I put all the bolts back in that hold the regulator rail and the motor bracket, and then tighten those up. Take the tape off, and you slide your window down, make sure it goes outside of the regulator. Then once the window's down, start the bolts in that hold the regulator to the window, and then tighten those up.
Now you're going to put the brace back on, it has an arrow that points up and it also has a Styrofoam block that goes in towards the inside of the door. Then use the four bolts to mount, tighten them up. Then put your water shield back up in place and the door panel brace back on.
To put this on, you want to get the back clipped in here first. I'm going to go at a pretty good angle, push it up, and then on. Now bring the front up, push it in towards the window and down on. Push the edges in. Put this back in place. Reach down in, grab the harness, and reconnect that. Push the front in first and then the back down in. We'll put our Phillips screw back in and then our little trim button.
We hope this video helps you out. Brought to you by www.1AAuto.com, your source for quality replacement parts and the best service on the Internet. Please feel free to call us toll-free, 888-844-3393. We're the company that's here for you on the Internet and in person.